Blog
How to Customize Your Prom Dress

By Nazy Rafaeil, Brand Strategist at Jovani
You found the dress. It is stunning. But something is not quite right. Maybe the neckline plunges lower than your school allows. Maybe you love the silhouette but wish it had sleeves. Maybe that thigh high slit feels like too much for your comfort level.
Here is what most girls do not realize: almost any prom dress can be customized. The dress you see online or in the store is a starting point, not the final product. With the right alterations, you can transform a dress that is almost perfect into one that fits your body, your style, and your comfort zone exactly.
At Jovani, our design team in New York City has spent over 40 years perfecting formal wear construction. We have seen every customization request imaginable, and we work with authorized retailers whose alteration specialists handle these modifications daily. This guide shares everything we have learned about what works, what does not, and how to get the exact look you want.
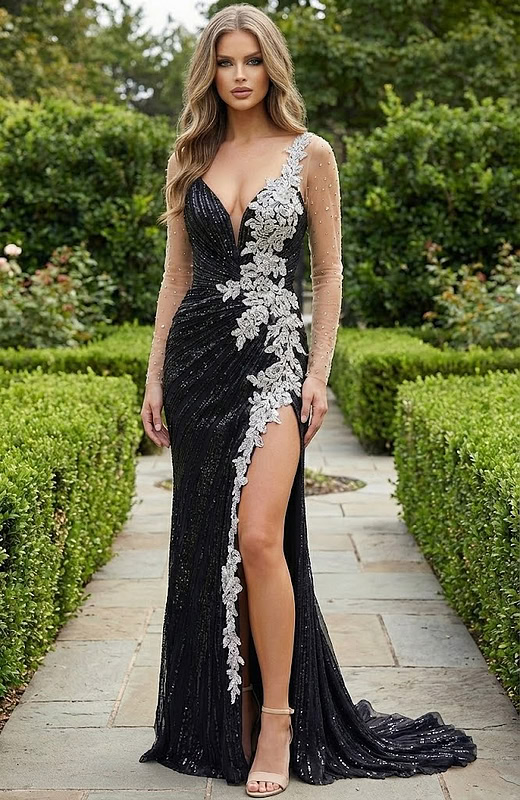
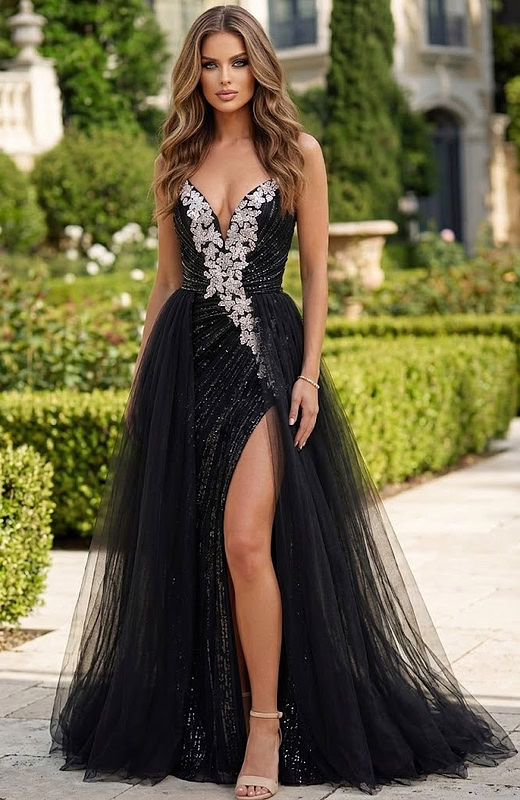
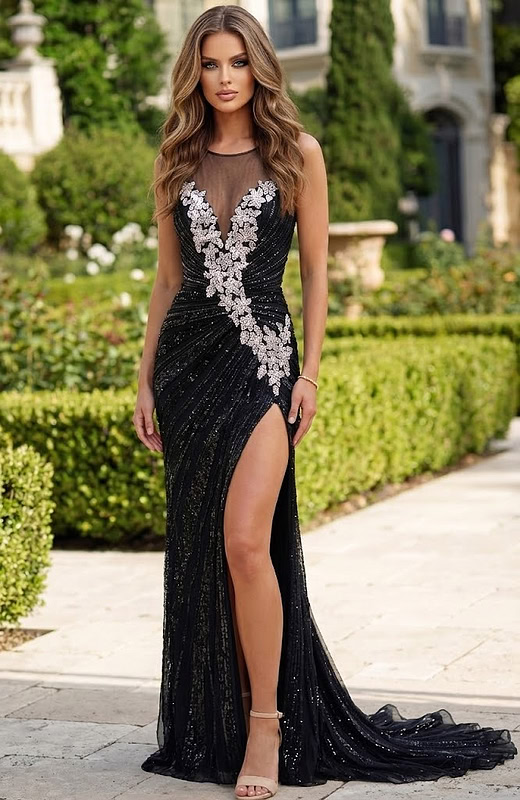
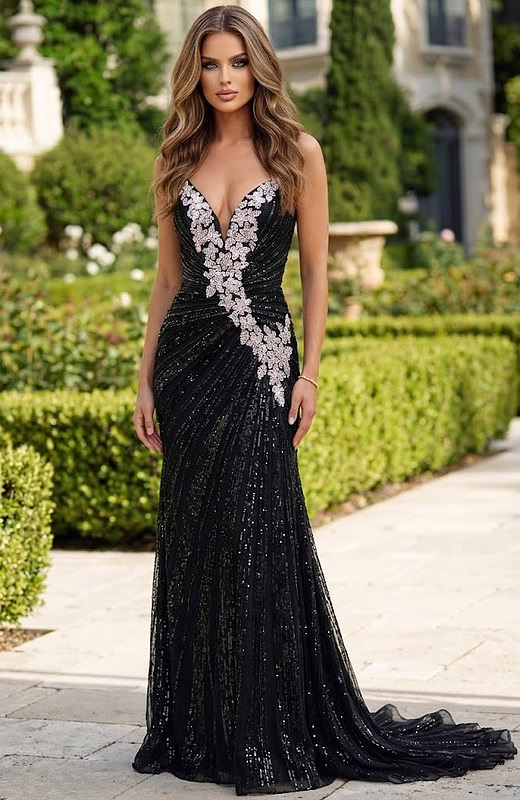
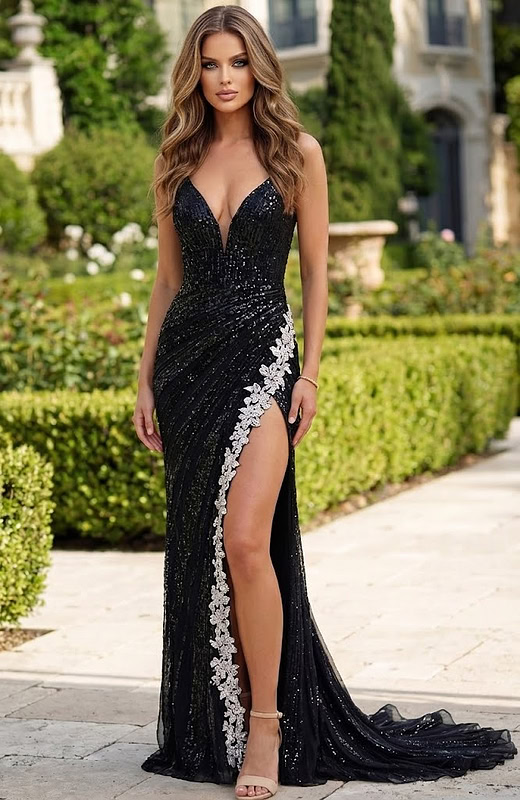
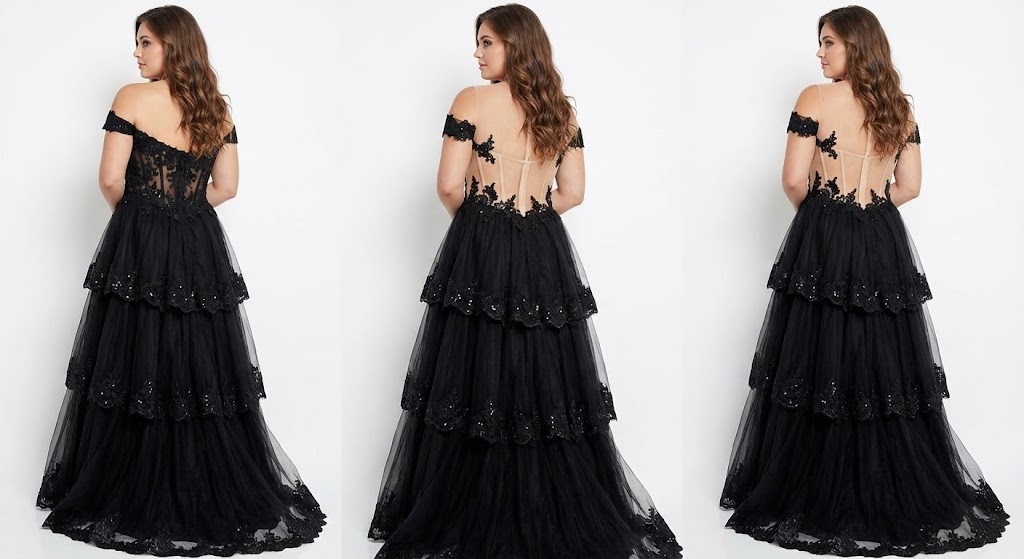
We are using one of our best selling prom dresses as our example throughout this guide: style 49268, a black sequin fitted gown with silver floral appliqué, a deep V neckline, and a high slit. This dress is a perfect teaching tool because it has multiple elements that girls commonly want to modify.

Six Ways to Customize Your Prom Dress
Every customization falls into one of two categories: adding coverage or changing the silhouette. The modifications below are the most requested changes we see, and all of them can be done by a skilled tailor or seamstress without compromising the integrity of the dress.
Add Illusion Sleeves
What it is: Sheer mesh sleeves with optional crystal or appliqué embellishment that attach to a strapless or spaghetti strap bodice.
Who it is for: Girls who want arm coverage for religious requirements, school dress codes, personal preference, or simply because they love the look of sleeves on formal wear.
How it works: A seamstress sources nude or skin tone illusion mesh that matches your complexion. The mesh gets cut to your arm measurements and attached at the shoulder seam and armhole. For a cohesive look, many girls add crystals or appliqué pieces that match the existing embellishments on the dress. The sleeves can be fitted all the way to the wrist, three quarter length, or cap sleeve style depending on your preference.
Cost estimate: $80 to $150 for basic illusion sleeves. Add $30 to $75 for crystal or appliqué embellishment.
Timeline: 1 to 2 weeks
DIY or tailor: Tailor recommended. Attaching sleeves to a structured bodice requires experience with formal wear construction to maintain the shape and support of the dress.
Pro tip: Bring a photo of the exact sleeve style you want. There is a big difference between a fitted long sleeve, a bishop sleeve, and a flutter sleeve. Your seamstress needs to see your vision.
Add a Detachable Tulle Overskirt
What it is: A separate tulle skirt that ties or hooks over your fitted dress, transforming a mermaid silhouette into a prom ball gown.
Who it is for: Girls who want two looks in one night. Wear the full skirt for grand entrance and photos, then remove it for dancing. Also perfect for anyone who loves ball gown drama but wants the comfort of a fitted dress underneath.
How it works: The overskirt is constructed separately from multiple layers of tulle gathered onto a waistband. It attaches with hooks, snaps, or ribbon ties at your natural waist. The best overskirts have an open front or a slit that lines up with your dress slit so you can show off the fitted silhouette underneath when you want to.
Cost estimate: $100 to $200 depending on tulle quality and fullness
Timeline: 2 to 3 weeks
DIY or tailor: This is one customization you can DIY if you are comfortable with basic sewing. Pre made detachable overskirts are available online, or you can purchase tulle by the yard and follow tutorials. The construction is forgiving because tulle hides imperfections.
Pro tip: Match your tulle color exactly. Black tulle comes in dozens of shades. Bring your dress when shopping for fabric or order swatches first.
Close the Plunge Neckline With Illusion Mesh
What it is: Nude or skin tone mesh panel inserted into a deep V or plunge neckline to provide coverage while maintaining the visual shape of the original design.
Who it is for: Girls whose school dress code prohibits necklines below a certain point, anyone who wants the look of a plunge without the exposure, or those who need coverage for religious or personal reasons.
How it works: A seamstress inserts illusion mesh behind the existing neckline, attaching it to the interior structure of the bodice. The mesh color gets matched to your skin tone so the V shape remains visible. For extra detail, some girls add crystals or small appliqué pieces to the mesh so it looks intentional rather than like an afterthought.
Cost estimate: $50 to $100
Timeline: 1 week
DIY or tailor: Tailor strongly recommended. Neckline work on a structured bodice requires precision. Done poorly, the mesh can pucker, pull, or create unflattering lines.
Pro tip: Ask your seamstress about mesh weight. Heavier mesh provides more coverage but can look obvious. Lighter mesh is more invisible but may require additional support.
Close or Reduce the Slit
What it is: Sewing the slit partially or completely closed to reduce leg exposure.
Who it is for: Girls who love a dress but feel the slit is too high for their comfort, those with school dress codes about slit height, or anyone who simply prefers a more modest look.
How it works: For partial closure, the seamstress sews the slit closed from the bottom up to your desired height. For complete closure, the entire slit gets sewn shut. The key is matching the existing seam line so the closure is invisible. On dresses with appliqué along the slit edge like our example dress, the seamstress may need to rearrange some embellishments to cover the seam.
Cost estimate: $30 to $60
Timeline: 3 to 5 days
DIY or tailor: This can be a DIY project if you have basic hand sewing skills and the slit has a clean edge without embellishments. For dresses with beading or appliqué along the slit, use a tailor.
Pro tip: Before committing to closing the slit completely, try on the dress and practice sitting and walking. A fully closed fitted skirt may restrict movement more than you expect. Sometimes reducing the slit by a few inches is the better choice.
Add Appliqué or Beading to the Slit Edge
What it is: Decorative embellishment added along the slit edge to make the opening feel more intentional and finished while drawing attention to the detail rather than the exposed leg.
Who it is for: Girls who want to keep the slit but make it feel less bare, those who want their dress to look more expensive and custom, or anyone who wants to tie mismatched elements of a dress together.
How it works: A seamstress hand sews appliqué pieces, beaded trim, or crystal chains along one or both edges of the slit. The embellishment can match existing details on the dress or introduce a complementary element. This customization works especially well on simple dresses where the slit feels unfinished.
Cost estimate: $60 to $120 depending on embellishment type and length
Timeline: 1 to 2 weeks
DIY or tailor: DIY friendly if you purchase iron on or adhesive appliqués. For hand sewn beading or appliqué that needs to match existing dress details exactly, use a professional.
Pro tip: Source your appliqué from the same place that sells to formal wear manufacturers. M&J Trimming in New York and Trims by the Yard online carry the same embellishments we use at Jovani.
Add a Cape or Shoulder Drape
What it is: A dramatic fabric attachment at the shoulders that flows behind you as you walk, creating movement and visual impact.
Who it is for: Girls who want a show stopping entrance, those who love drama and movement, anyone who wants their dress to photograph with flow and motion, or those who want shoulder coverage without traditional sleeves.
How it works: The cape attaches at the shoulder straps or at the back neckline with hooks, snaps, or can be sewn directly to the dress. Cape styles range from short shoulder drapes that hit the elbow to floor length panels that trail behind you. Tulle capes add ethereal movement while chiffon or satin capes create more structure.
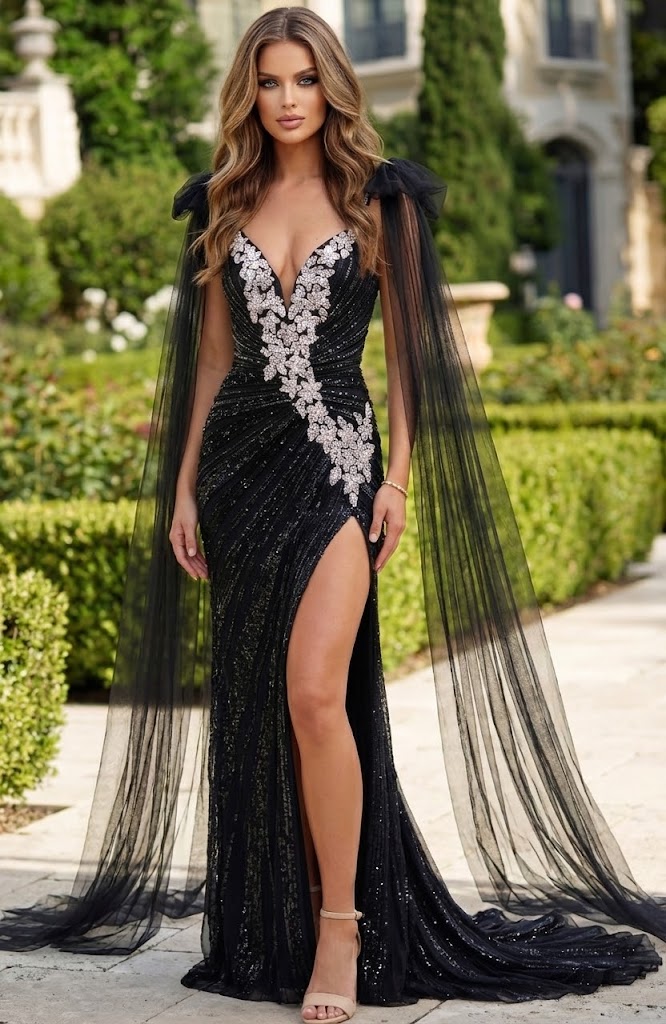
Cost estimate: $75 to $175 depending on fabric and length
Timeline: 2 to 3 weeks
DIY or tailor: Tailor recommended for attached capes. Detachable capes that simply hook on can be purchased pre made or constructed as a DIY project.
Pro tip: Think about your venue. Floor length capes look incredible in photos but can be impractical on crowded dance floors. Consider a detachable style so you can remove it after the grand entrance.
Quick Reference: Standard Customizations
| Customization | Cost | Timeline | DIY Possible |
|---|---|---|---|
| Illusion sleeves | $80-$150 | 1-2 weeks | No |
| Detachable overskirt | $100-$200 | 2-3 weeks | Yes |
| Illusion neckline insert | $50-$100 | 1 week | No |
| Close or reduce slit | $30-$60 | 3-5 days | Sometimes |
| Appliqué on slit edge | $60-$120 | 1-2 weeks | Yes |
| Cape or shoulder drape | $75-$175 | 2-3 weeks | Sometimes |
Customizations for Plus Size Prom Dresses
If you wear plus sizes, you already know the frustration. You find a dress you love online, scroll through the photos, and every single image shows the same body type. The customization advice you find is written for straight sizes. The alteration guides assume your concerns are the same as everyone else’s.
They are not.
Plus size formal wear has its own set of customization possibilities, and honestly, some of the best ones. The techniques in this section address what plus size customers actually ask for: more coverage options, better support, and ways to make a gorgeous dress work even better for your specific body.
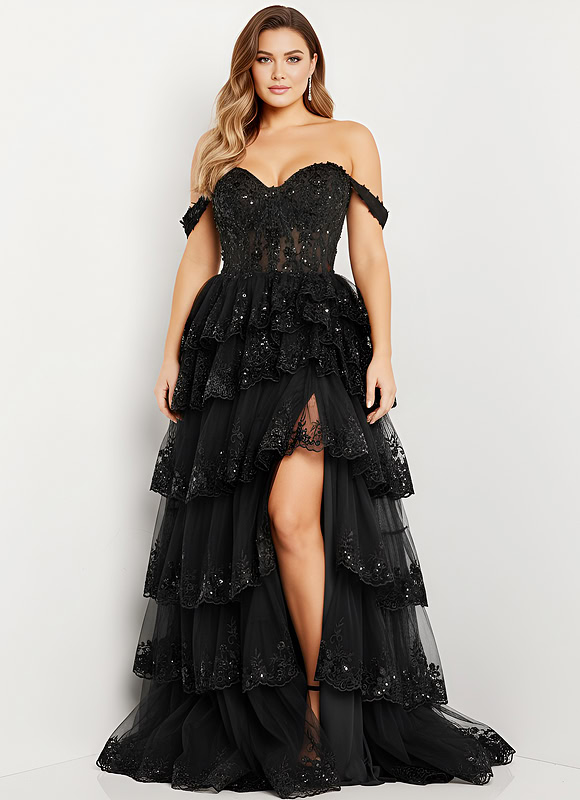
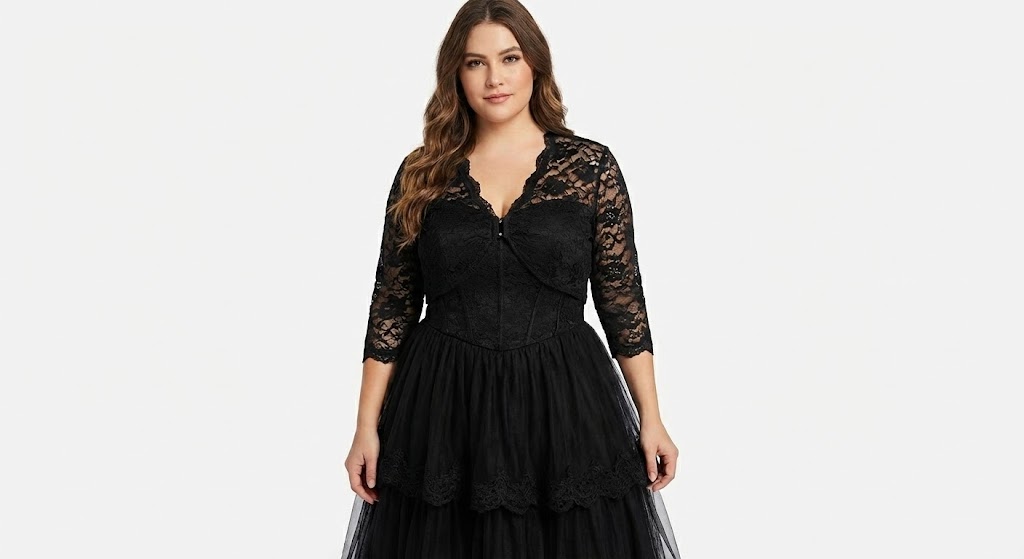
For this section, we are using Jovani style 36687, a black off shoulder tiered ball gown with a lace corset bodice. This dress already has beautiful construction, but we will show you how to customize it even further to match exactly what you want.
Convert Off Shoulder to Full Sleeves
What it is: Extending short off shoulder sleeves into full length sleeves using matching lace or illusion mesh with lace appliqué.
Who it is for: Anyone who wants full arm coverage, whether for personal style preference, religious requirements, or simply because you love the look of long sleeves on formal wear. Long lace sleeves are elegant and timeless.
How it works: A seamstress extends the existing off shoulder sleeve down to your wrist using lace that matches or complements the bodice. The sleeve can be fitted, slightly relaxed, or even feature a slight bell at the wrist for a romantic look. The key is sourcing lace with a similar weight and pattern to the original so the addition looks intentional rather than like an afterthought. On a dress like this with detailed lace appliqué on the bodice, continuing that appliqué onto the sleeves creates a cohesive custom look.
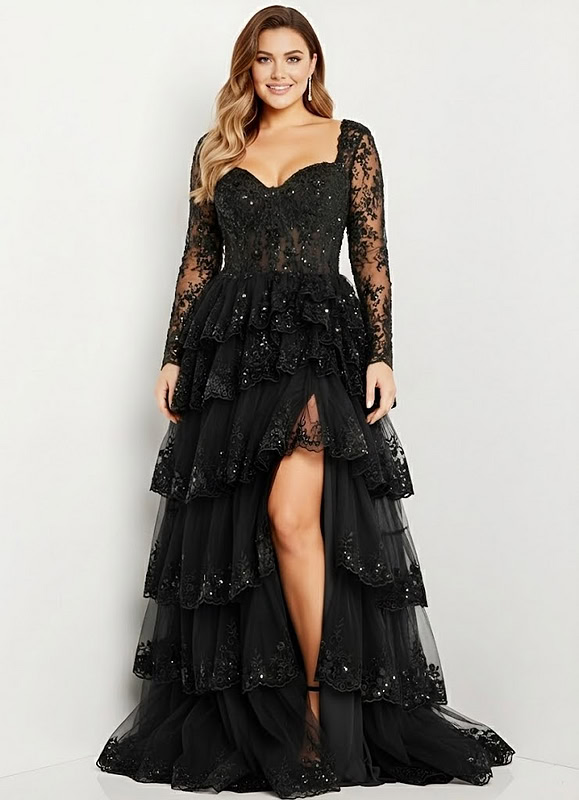
Cost estimate: $120 to $200 depending on lace quality and sleeve length
Timeline: 2 to 3 weeks
DIY or tailor: Tailor required. Matching lace and attaching sleeves to an off shoulder neckline requires expertise to maintain the structure and fit of the bodice.
Pro tip: Bring the dress when shopping for matching lace. Photos never capture lace patterns accurately. Your seamstress or a fabric store specialist can help you find the closest match, or you can choose a complementary lace that creates an intentional contrast.
Add an Illusion Neckline for More Coverage
What it is: Sheer mesh panel extending from the existing neckline up to a higher point, creating coverage while still showcasing the original design.
Who it is for: Anyone who loves a sweetheart or plunge neckline dress but wants more coverage across the chest and collarbone area. This customization lets you keep the beautiful shape of the original design while adding the coverage you prefer.
How it works: A seamstress attaches illusion mesh in a shade that matches your skin tone from the sweetheart neckline up to wherever you want it, whether that is a modest scoop neck, a high jewel neckline, or somewhere in between. For a cohesive look, lace appliqué pieces from the bodice pattern get added to the mesh. The result looks like the dress was designed that way from the start.
Cost estimate: $75 to $150 depending on how much appliqué work is needed
Timeline: 1 to 2 weeks
DIY or tailor: Tailor required. Attaching mesh to a structured corset bodice while maintaining the shape and support requires professional expertise.
Pro tip: Ask for the mesh to extend slightly into the shoulder area if you want coverage there too. The illusion panel can wrap around to create a complete coverage solution that still looks delicate and beautiful.
Add a Lace Bolero or Jacket
What it is: A separate cropped jacket in matching or complementary lace that you can wear over your dress and remove whenever you want.
Who it is for: Anyone who wants the option of arm and shoulder coverage without permanently altering the dress. Perfect if you want full coverage for the ceremony or photos but want to remove the jacket for dancing later. Also ideal if you are not completely sure how much coverage you want and like having options.
How it works: The bolero is constructed as a separate garment, typically hitting at the natural waist or just below the bust. It can have three quarter sleeves, full sleeves, or cap sleeves depending on your preference. The bolero usually closes with a single hook at the center front or remains open. Because it is a separate piece, you can have it custom made to match your dress exactly or purchase a pre made bolero in a complementary style.
Cost estimate: $100 to $250 for custom made. $40 to $100 for pre made.
Timeline: 2 to 4 weeks for custom. Immediate for pre made.
DIY or tailor: This can go either way. Pre made boleros are available in many styles and can be altered to fit. Custom boleros require a tailor but give you an exact match to your dress.
Pro tip: If going custom, have the bolero made from the same lace as your dress alterations so everything matches perfectly. If buying pre made, bring your dress to the store to check the color match in person. Black lace varies significantly in undertone and pattern density.
Customize the Back: From Open to Covered
What it is: Adding coverage to an open back dress using illusion mesh, lace panels, or strap modifications.
Who it is for: Anyone who loves a dress but wants more coverage in the back. Maybe the dress has a stunning front but the back feels too exposed. Maybe you prefer not to wear a backless bra. Whatever the reason, back coverage is one of the most requested customizations we see.
How it works: There are several approaches depending on how much coverage you want. For sheer coverage that shows a hint of skin, illusion mesh gets inserted into the back opening with optional lace appliqué. For more substantial coverage, a lace panel matching the bodice can fill the entire back. For structural coverage that also adds support, a combination of mesh and boning can be used. Your seamstress can also modify existing straps to create a different back configuration entirely.
Cost estimate: $60 to $175 depending on coverage level and complexity
Timeline: 1 to 2 weeks
DIY or tailor: Tailor required. Back modifications affect the structure and fit of the entire bodice and need professional handling.
Pro tip: Think about your undergarments when planning back coverage. If you want to wear a regular bra, make sure your seamstress knows so they can design the coverage to conceal bra straps and bands. Adding back coverage often makes the dress more comfortable because it allows for better undergarment options.
Add Internal Bust Support and Boning
What it is: Reinforcing the internal structure of the bodice with additional boning, cups, or support panels.
Who it is for: Anyone who wants more support than the dress provides as constructed. This customization is about comfort and confidence, making sure the dress stays exactly where it should all night without constant adjusting.
How it works: A seamstress can add several types of internal support. Additional boning channels can be sewn into the bodice to create more structure. Molded cups can be sewn in for shape and support. An internal support panel or power mesh lining can be added for all over smoothing and hold. On corset style dresses like our example, the existing boning can be reinforced or additional bones can be added between the existing channels. The result is invisible from the outside but makes a significant difference in how the dress feels and fits.
Cost estimate: $50 to $125 depending on what is added
Timeline: 1 to 2 weeks
DIY or tailor: Tailor required. Internal structural work requires understanding of formal wear construction and proper placement of support elements.
Pro tip: Be specific about what kind of support you need. More support can mean different things. Do you need the bodice to stay up better? Do you need more shape in the bust area? Do you need smoothing through the midsection? The more specific you are with your seamstress, the better the result.
Let Out Side Seams for Better Fit
What it is: Releasing fabric at the side seams to add room through the hip, waist, or bust area.
Who it is for: Anyone whose dress is slightly too snug in certain areas. This is one of the most common alterations and can make the difference between a dress that is uncomfortable and one that fits perfectly.
How it works: Most quality formal dresses are constructed with seam allowances that allow for adjustment. A seamstress opens the side seams and releases fabric where needed, then re-sews the seam at the new position. How much can be let out depends on the original construction, typically half an inch to one and a half inches per seam. On dresses with boning or structure in the bodice, the internal elements may need adjustment as well. On prom gowns with heavy embellishment at the seams, the seamstress may need to carefully work around or reposition beading or appliqué.
Cost estimate: $40 to $100 depending on dress construction and embellishment
Timeline: 1 week
DIY or tailor: Tailor required for formal wear. The structured construction and often delicate fabrics need professional handling.
Pro tip: If you are between sizes when ordering, size up and have the dress taken in rather than sizing down and hoping it can be let out. Taking in is generally easier than letting out and gives more flexibility.
Quick Reference: Plus Size Customizations
| Customization | Cost | Timeline | DIY Possible |
|---|---|---|---|
| Full lace sleeves | $120-$200 | 2-3 weeks | No |
| Illusion high neckline | $75-$150 | 1-2 weeks | No |
| Lace bolero jacket | $100-$250 | 2-4 weeks | Sometimes |
| Back coverage panel | $60-$175 | 1-2 weeks | No |
| Internal bust support | $50-$125 | 1-2 weeks | No |
| Let out side seams | $40-$100 | 1 week | No |
Customizations for Different Body Types
Every body is different, and the best customizations depend on your specific proportions. This section covers common alterations for petite frames, tall frames, larger busts, and smaller busts. These modifications work alongside the customizations above, so you can combine them as needed.
Petite Frames
If you are 5’3″ or under, your biggest challenge is proportion. Dresses are designed for an average height of around 5’7″ in heels, which means everything from hem length to bodice length to strap placement may need adjustment.
Hemming: The most obvious alteration. A petite girl will almost always need to shorten the dress from the bottom. The key is maintaining the original design proportions. If the dress has a dramatic train, shortening it too much can lose the effect. If the dress has embellishment near the hem, your seamstress may need to remove and reattach it after shortening. Budget $50 to $150 for hemming depending on the dress complexity and whether beading needs to be preserved.
Taking up from the shoulders: Sometimes the bodice itself is too long, which makes the waistline hit in the wrong place. A seamstress can shorten the bodice by taking fabric from the top at the shoulder straps rather than just hemming from the bottom. This keeps the waist where it belongs and maintains the dress proportions. This is more complex than a simple hem and costs $75 to $150.
Adjusting strap length: Even on strapless dresses, the internal structure assumes a certain torso length. On petite frames, straps may need to be shortened significantly or the entire shoulder line may need to be raised. Your seamstress can adjust this, but it needs to be done carefully to maintain the neckline shape. Budget $30 to $75.
Choosing the right silhouette: Some silhouettes work better for petite frames than others. A line prom dresses elongate the body. Fit and flare styles with a defined waist create proportion. Very full ball gowns can overwhelm a petite frame, but a modified ball gown with less volume works beautifully. High low hems are particularly flattering because they show leg and create a lighter visual weight.
Pro tip: When ordering, check the dress measurements carefully. Many formal dresses list the hollow to hem measurement, which tells you exactly how long the dress is from the base of your neck to the floor. Compare this to your own measurements before ordering to estimate how much hemming you will need.
Tall Frames
If you are 5’9″ or taller, your challenge is the opposite of petite. Standard length dresses may hit too high, showing more ankle than intended or making the proportions look off.
Adding length: A seamstress can add length to the bottom of a dress using matching or complementary fabric. The best approach depends on the original hem treatment. If the dress has a simple hem, matching fabric can be seamed invisibly. If there is embellishment at the hem, the addition may need to go above the embellished area. Tulle and chiffon are easier to extend because the layers hide seams. Structured fabrics like satin require more precise matching. Budget $60 to $150 depending on complexity.
Lengthening straps: On tall frames with longer torsos, the bodice may sit too high, pulling up uncomfortably or creating an unflattering bustline. Lengthening straps is a simple fix that drops the bodice to the correct position. Budget $25 to $50.
Choosing the right silhouette: Tall frames can wear almost any silhouette, but some particularly shine. Mermaid prom dresses look stunning on height. Column gowns emphasize the elegant line. Full ball gowns have enough presence to match a taller frame without overwhelming it. High slits look proportionally correct on longer legs.
Pro tip: Order early and discuss length with your retailer before the dress arrives. Some manufacturers offer longer length options for certain styles. If you know you will need extra length, it is easier to build it into the order than to add it after the fact.
Larger Bust
If you have a larger bust, your challenges are fit and support. Dresses designed for average proportions may gap at the neckline, lack sufficient support, or fit awkwardly through the bust while being too large elsewhere.
Fixing neckline gaps: V necks, sweetheart necklines, and strapless bodices often gap away from the chest on larger busts because there is more curve for the fabric to follow. A seamstress can add darts, reshape the neckline edge, or add interior boning to pull the fabric closer to the body. For plunge necklines, adding illusion mesh prevents the sides from pulling apart while maintaining the visual design. Budget $40 to $100.
Adding support: Many formal dresses lack adequate bust support, relying on the structure of the bodice alone. A seamstress can add interior cups, boning, or even attach a bra directly to the inside of the dress. For strapless styles, adding boning channels on either side of the bust creates lift and security. Adding an interior power mesh panel provides overall support without bulk. Budget $50 to $125.
Balancing proportions: If a dress fits perfectly in the bust but is too large through the waist and hips, taking in the side seams creates a balanced fit. This is better than sizing down and struggling with the bust. A skilled seamstress can rebalance the entire dress to fit your proportions. Budget $60 to $150 for comprehensive resizing.
Choosing the right silhouette: Supportive necklines like halter prom styles distribute weight across the back of the neck rather than relying on strapless structure alone. V necks create a flattering line while accommodating curves. Dresses with built in corset bodices provide structure. Avoid styles with very thin spaghetti straps unless you plan to add internal support.
Pro tip: When trying on dresses, bring the exact undergarments you plan to wear. The difference between no bra, a strapless bra, and a supportive underwire bra changes how the dress fits significantly. Your seamstress needs to see the dress with your actual undergarments to make the right adjustments.
Smaller Bust
If you have a smaller bust, your challenges are different. Bodices may gap or stand away from the chest, strapless styles may slide down, and structured cups may create empty space rather than shape.
Eliminating gaps: When a bodice is designed for more bust than you have, the fabric gaps away from the body at the top edge. A seamstress can take in the bodice at the bust through darts, reshape the neckline to sit higher, or remove excess fabric from the cups if they are structured. The goal is making the bodice lay flat against your body. Budget $40 to $90.
Taking in cups: Structured bodices with built in cups can be reshaped for a smaller bust. The seamstress removes the interior cups, reshapes them smaller, and reattaches them. Alternatively, the structured cups can be replaced with a flat lining for a sleeker look. Budget $50 to $100.
Preventing slipping: Strapless dresses are particularly prone to slipping on smaller busts because there is less to hold them up. A seamstress can add silicone grip tape to the interior top edge, add boning for structure, or build in a strap system that can be hidden or removed. Some girls add clear convertible straps for security even if the dress was designed as strapless. Budget $25 to $75 for grip tape and minor adjustments, $50 to $100 for structural modifications.
Choosing the right silhouette: One shoulder prom styles stay secure without relying on bust for support. High necklines create a beautiful line without needing to fill out a sweetheart shape. A line and empire waist silhouettes look elegant without emphasizing the bust area. Dresses with interesting detail on the bodice like beading, lace, or ruching add visual interest without requiring volume.
Pro tip: Consider whether you want to create shape or embrace your natural silhouette. Both approaches look beautiful. If you want to add volume, a seamstress can add padding or push up cups. If you prefer a sleeker look, they can remove structured cups entirely for a more natural line. Neither is better, just different.
How to Find the Right Tailor
The quality of your customization depends entirely on who does the work. A skilled seamstress can make a $300 dress look like couture. An inexperienced one can ruin an expensive gown. Here is how to find the right person for your alterations.
Where to Look
Start with your retailer. Authorized Jovani retailers either have in house alteration specialists or relationships with trusted local seamstresses who work on formal wear regularly. They see our dresses constantly and understand the construction. This is usually the safest option.
If you bought online or your retailer does not offer alterations, look for seamstresses who specialize in formal wear or bridal. These are not the same as general tailors who do suit alterations and hemming. Formal wear requires specific skills: working with delicate fabrics, handling beading and embellishments, understanding boned bodices, and matching invisible seams on structured garments.
Ask local bridal shops for recommendations even if you are not buying a wedding dress. They work with formal wear seamstresses daily and know who does quality work. Prom Facebook groups and Reddit communities for your local area can also provide recommendations from girls who have had alterations done recently.
Questions to Ask Before Committing
Before handing over your dress, have a consultation and ask these questions:
Have you worked with this type of dress before? Beaded dresses, corset bodices, and layered tulle all require different expertise. Make sure they have experience with your specific dress construction.
Can you show me examples of similar work? Most experienced seamstresses have photos of their formal wear alterations. Look for clean seams, well matched fabrics, and professional finishing.
What is your timeline? Formal wear alterations take longer than everyday clothing. Make sure their timeline fits your deadline with some buffer for potential issues.
What is your pricing structure? Get specific quotes for each alteration you need. Ask if the quote includes everything or if there could be additional charges once they start working.
What happens if something goes wrong? A professional seamstress should have liability policies in place. Ask how they handle situations where alterations do not turn out as planned.
Red Flags to Watch For
Walk away if a seamstress cannot answer your questions confidently, gives you a quote without looking at the dress in person, promises an unusually fast turnaround on complex work, has no photos or references to share, or pressures you to decide immediately. Trust your instincts. If something feels off during the consultation, find someone else.
Planning Your Alteration Timeline
Timing matters. Rush jobs cost more and increase the risk of mistakes. Here is a realistic timeline for prom dress alterations.
8 to 12 weeks before prom: Order your dress. This gives time for shipping and any manufacturer delays.
6 to 8 weeks before prom: First fitting. Try on the dress and discuss all needed alterations with your seamstress. This appointment is for planning, not for completing work.
4 to 6 weeks before prom: Alterations in progress. Complex customizations like adding sleeves, creating overskirts, or major structural changes happen during this window.
2 to 3 weeks before prom: Second fitting. Check the alterations and make any final adjustments. Simple fixes like hem tweaks or taking in seams slightly can be done now.
1 week before prom: Final pickup. Your dress should be completely finished with time to spare for any last minute emergencies.
If you are running behind this timeline, be honest with your seamstress about your deadline. They may be able to accommodate a rush, but they need to know upfront. Expect to pay extra for expedited work.
What Not to Customize
Not every dress can handle every customization. Some modifications are risky, impractical, or simply not worth the cost. Here is what to avoid.
Changing the fundamental silhouette: You cannot turn a ball gown into a mermaid or vice versa. The internal structure, seaming, and fabric cuts are completely different. If you want a different silhouette, buy a different dress.
Removing heavy beading: Beaded dresses have holes where each bead attaches. Removing beading leaves visible holes and weakened fabric. If you do not like the beading on a dress, choose a different dress.
Dyeing the dress: Most formal wear fabrics do not dye evenly, and the process can damage embellishments, linings, and structure. If you want a different color, buy a different dress.
Adding significant structure to an unstructured dress: A flowy chiffon dress cannot be converted into a structured, boned bodice. The fabric is not designed for it. Choose a dress that already has the level of structure you want.
Making a dress much larger: Seam allowances only allow for limited expansion. If a dress is more than one size too small, it cannot be let out enough to fit properly. Order the right size from the start.
Extreme timeline customizations: If prom is in two weeks and you want sleeves added, the slit closed, and the back completely restructured, be realistic. Some customizations simply take time, and rushing leads to poor results.
Start With the Right Base
The best customizations start with a dress that is already close to what you want. Trying to completely transform a dress is expensive, time consuming, and often disappointing. Instead, choose a dress that has the silhouette, construction, and overall vibe you are looking for, then customize the details.
At Jovani, we design our prom dresses with customization in mind. Our construction techniques, seam allowances, and fabric choices allow for the alterations girls most commonly request. When you start with quality construction, your seamstress has more to work with.
If you are not sure what customizations are possible on a specific dress, ask before you buy. Your retailer or our customer service team can tell you what modifications work well with each style. A few minutes of research upfront saves frustration later.
Your prom dress should make you feel confident, comfortable, and completely yourself. With the right customizations, any dress can become exactly what you envisioned.
Do It Yourself: Step by Step Guides
Some customizations are simple enough to do at home with basic supplies and a few hours. These four projects require no sewing machine and minimal experience. If you have patience, can thread a needle, and follow instructions carefully, you can save money and create something truly custom.
Before starting any DIY project, read through all the steps first. Gather your materials. Work in good lighting on a clean surface. And most importantly, do a test run on scrap fabric if you are nervous. These guides work, but practice builds confidence.
DIY Project 1: Detachable Tulle Overskirt
This is the most dramatic transformation you can do yourself. A tulle overskirt turns a fitted mermaid dress into a ball gown, giving you two completely different looks for one event. Wear the full skirt for your grand entrance and photos, then remove it for dancing.
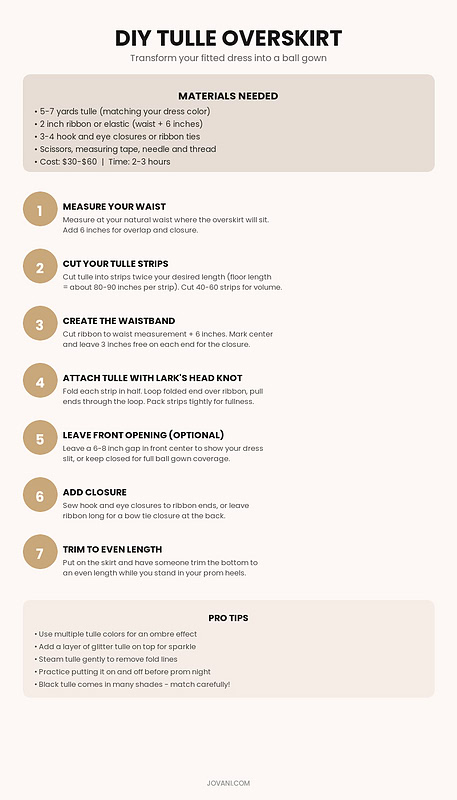
Materials needed:
5 to 7 yards of tulle in your dress color, 2 inch wide ribbon or elastic cut to your waist measurement plus 6 inches, 3 to 4 hook and eye closures or ribbon for tie closure, scissors, measuring tape, needle, and thread.
The process:
Measure your natural waist where the overskirt will sit and add 6 inches for overlap and closure. Cut your ribbon to this length and mark the center.
Cut your tulle into strips that are twice your desired finished length. For floor length on an average height person, this means strips around 80 to 90 inches long. You will need 40 to 60 strips depending on how full you want the skirt. More strips equals more drama.
Attach each tulle strip to the ribbon using a lark’s head knot. Fold the strip in half, place the folded loop behind the ribbon, bring the two loose ends up and through the loop, and pull tight. Pack the strips close together. Leave the last 3 inches on each end of the ribbon free for your closure.
If you want to show your dress slit, leave a 6 to 8 inch gap in the front center when attaching strips. If you want full coverage, attach strips all the way around.
For the closure, sew hook and eye closures to the ribbon ends, or leave the ribbon extra long and tie a bow at the back.
Finally, put on the overskirt with your heels and have someone trim the tulle to an even length. Tulle is forgiving, so small imperfections will not show.
Cost: $30 to $60
Time: 2 to 3 hours
Difficulty: Easy to medium
DIY Project 2: Close or Reduce Your Slit
If your dress slit feels too high for your comfort or your school dress code, this is one of the easiest alterations to do yourself. All you need is matching thread and basic hand sewing skills. The best part: this alteration is completely reversible. If you change your mind, just carefully cut the stitches.

Materials needed:
Thread that matches your dress exactly (buy several shades and compare), a small sharp hand sewing needle, straight pins, scissors, and a seam ripper just in case.
The process:
Put on the dress with your prom heels. Use a pin to mark exactly where you want the slit to end. Practice sitting down to make sure you are leaving enough room for movement. Mark on both sides of the slit.
Turn the dress inside out and lay it flat on a clean surface. Align the two edges of the slit perfectly and pin them together from the bottom up to your marked point, placing pins every 2 to 3 inches.
Thread your needle with about 18 inches of thread and knot the end. Use a ladder stitch, which is invisible from the outside. Take a small stitch on one side of the slit, then a small stitch directly across on the other side. Continue alternating sides, pulling gently every few stitches to close the gap. Keep your stitches small, about a quarter inch, for the most invisible result.
When you reach your marked point, make several small stitches in the same spot to secure the thread, then knot and trim.
Turn the dress right side out and try it on. Walk around, sit down, and make sure you can move comfortably. If it feels too tight, use your seam ripper to remove some stitches and close less of the slit.
Cost: $5 to $15
Time: 30 to 60 minutes
Difficulty: Easy
Important note: If your slit has beading, sequins, or appliqué along the edge, do not attempt this yourself. The embellishments complicate the closure and a tailor needs to handle it.
DIY Project 3: Add Appliqué to Your Slit Edge
Adding decorative trim along your slit edge transforms a simple opening into a design feature. This works especially well on plain dresses where the slit feels unfinished. You can use lace appliqué, beaded trim, rhinestone chain, or any decorative element that complements your dress.
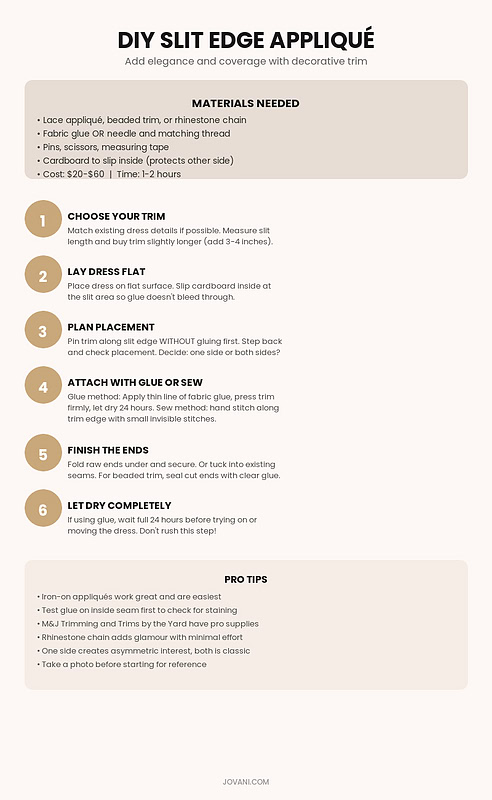
Materials needed:
Lace appliqué, beaded trim, or rhinestone chain slightly longer than your slit length, fabric glue or needle and matching thread, straight pins, scissors, measuring tape, and a piece of cardboard to slip inside the dress.
The process:
Measure your slit length and purchase trim about 3 to 4 inches longer than you need. This gives you room for adjustments and finishing the ends.
Lay your dress flat on a clean surface. Slip a piece of cardboard inside at the slit area to prevent glue from bleeding through to the other layer of fabric.
Plan your placement before attaching anything. Pin the trim along the slit edge and step back to look at it. Decide whether you want trim on one side for asymmetric interest or both sides for a classic look. Adjust until you like the placement.
If using fabric glue, apply a thin line along the back of the trim and press it firmly to the dress. Work in small sections and keep the trim straight. Let dry for 24 hours before moving the dress.
If sewing, use small invisible stitches along the trim edge. This takes longer but creates a more secure attachment that will survive dancing and dry cleaning.
Finish the ends by folding raw edges under and securing with glue or stitches. For beaded trim, seal cut ends with clear nail polish or fabric glue to prevent beads from falling off.
Cost: $20 to $60
Time: 1 to 2 hours
Difficulty: Easy
Where to buy supplies: M&J Trimming in New York carries professional quality appliqués and trims. Online, try Trims by the Yard or Amazon for basic options. For the exact embellishments used on formal wear, search for bridal appliqués.
DIY Project 4: Detachable Cape
A cape creates drama and movement in photos while covering shoulders without adding traditional sleeves. This detachable version hooks onto your dress straps and removes in seconds, so you get the grand entrance moment and then freedom to dance.
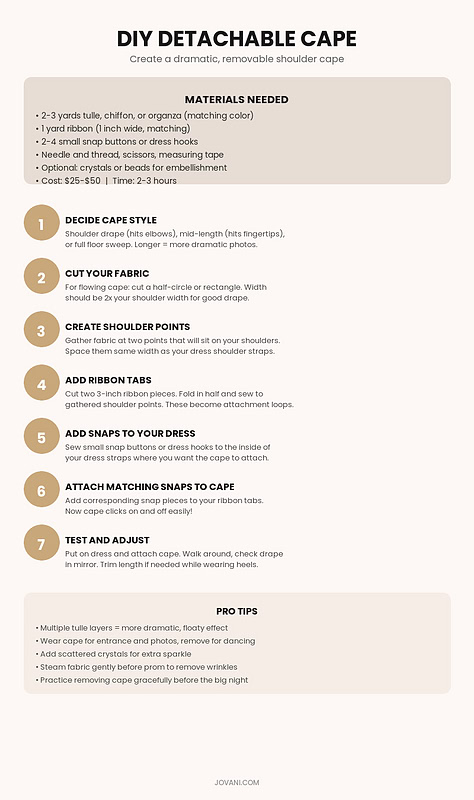
Materials needed:
2 to 3 yards of tulle, chiffon, or organza in your dress color, 1 yard of 1 inch wide ribbon, 2 to 4 small snap buttons or dress hooks, needle and thread, scissors, and measuring tape.
The process:
Decide on your cape length first. A shoulder drape hits around your elbows. Mid length hits your fingertips. A full floor sweep trails behind you. Longer capes are more dramatic in photos but can be impractical on a crowded dance floor.
For a simple flowing cape, cut a rectangle of fabric. The width should be about twice your shoulder width for good drape. The length is your desired finished length plus 2 inches for gathering.
Create two gathering points on the top edge of the fabric where the cape will attach to your shoulders. These should be spaced the same width as your dress shoulder straps. Gather the fabric at each point and secure with a few stitches.
Cut two 3 inch pieces of ribbon. Fold each in half to create a loop and sew one to each gathered shoulder point. These become your attachment tabs.
Now modify your dress. Sew small snap buttons or dress hooks to the inside of your dress straps at the shoulder. Then sew the matching snap pieces to your cape ribbon tabs.
Try on the dress and snap on the cape. Walk around and check the drape in a mirror. If the length needs adjustment, trim while wearing your prom heels.
Cost: $25 to $50
Time: 2 to 3 hours
Difficulty: Medium
Variations: For more dramatic volume, use multiple layers of tulle. For sparkle, add scattered rhinestones or sequins. For an ombre effect, layer two colors of tulle with the lighter shade on top.
Quick Reference: All DIY Projects
| Project | Cost | Time | Difficulty | Reversible |
|---|---|---|---|---|
| Tulle overskirt | $30-$60 | 2-3 hours | Easy-Medium | Yes (separate piece) |
| Close slit | $5-$15 | 30-60 min | Easy | Yes (cut stitches) |
| Slit appliqué | $20-$60 | 1-2 hours | Easy | Mostly (if sewn) |
| Detachable cape | $25-$50 | 2-3 hours | Medium | Yes (snap off) |
Before You Start Any DIY Project
Test everything first. If using glue, test on an inside seam to make sure it does not stain your fabric. If sewing, practice your stitch on scrap fabric. If buying trim, bring your dress to the store to match colors in person.
Time your project right. Do not attempt DIY alterations the night before prom. Give yourself at least a week in case something goes wrong and you need a professional to fix it.
Know your limits. These four projects are genuinely doable for beginners, but if you feel overwhelmed or your dress is expensive and you are nervous, there is no shame in taking it to a tailor. A professional can complete any of these alterations for $30 to $100 more than DIY cost.
Save your receipts and leftover materials. If you decide to undo a DIY alteration or need more supplies to fix a mistake, having extras on hand saves a trip to the store.
This guide was developed by the Jovani design team with over 40 years of formal wear expertise, in consultation with Chief Designer Julie DuRocher and alteration specialists from our authorized retailer network across the United States.